The following content is archived, and is being kept for reference, research, or recordkeeping.

Or Why To Avoid Hardware Store Mortar While Repairing Historic Masonry
By Jansen Bennett, Historical Architect
Like any good blog on historic mortar, I’m going to start by discussing cake.
That’s right. Cake. Think for just a moment about a slice of your favorite cake. Maybe you like a dense chocolate cake with a smooth fudge ganache. Or perhaps a nice carrot cake, chock full of carrots and raisins and topped with a tangy cream cheese frosting. Maybe you prefer my personal favorite: a standard vanilla cake with vanilla buttercream. Boring as it may be, I love it.
Now that you’re salivating, let’s talk about what makes a good cake. Beyond the myriad of different flavor combinations, every good cake has the same general components:

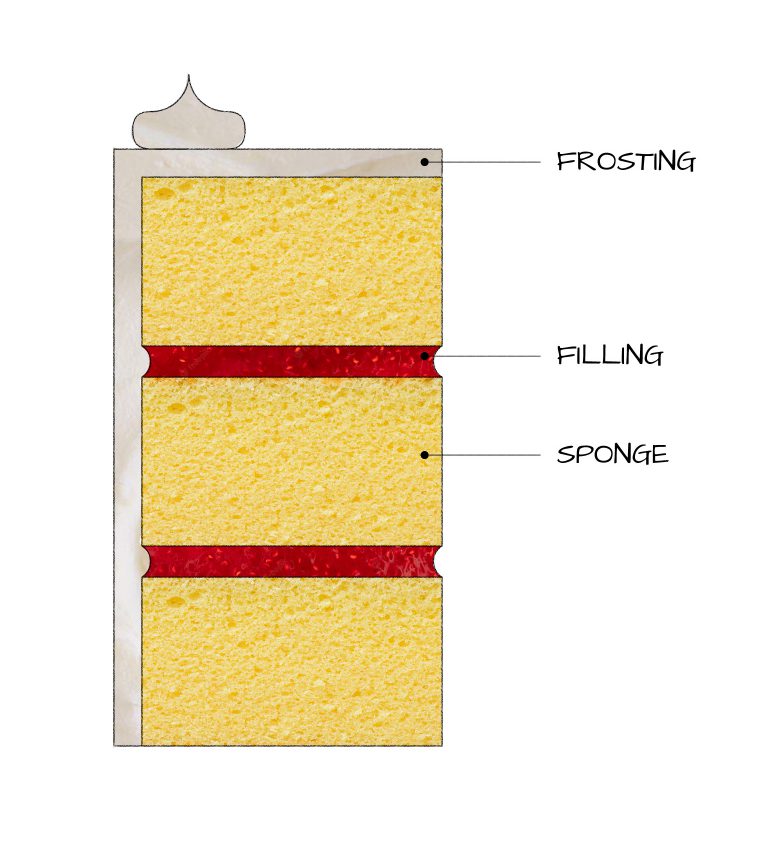
- Sponge. The sponge is the primary structural component of the cake and typically contains flour and eggs that allow for a sturdy yet springy consistency.
- Filling. The filling acts as glue, holding the layers of sponge together. Almost anything can be used as a filling including frosting, pudding, mousse, and custard. As long as the filling is viscous and tasty, you’re set.
- Frosting. The frosting is the outermost layer, and ensures that the cake is moist. For this reason its primary ingredient is fat which, beyond tasting great, repels water and keeps the cake from drying out. As an added benefit, it looks pretty.
With all of these elements working together, the cake will look good (both whole and sliced), stay moist for days, and be delicious.
You may be surprised to find that your favorite piece of cake has a lot in common with historic masonry. Like cake, a historic masonry wall has three key components:
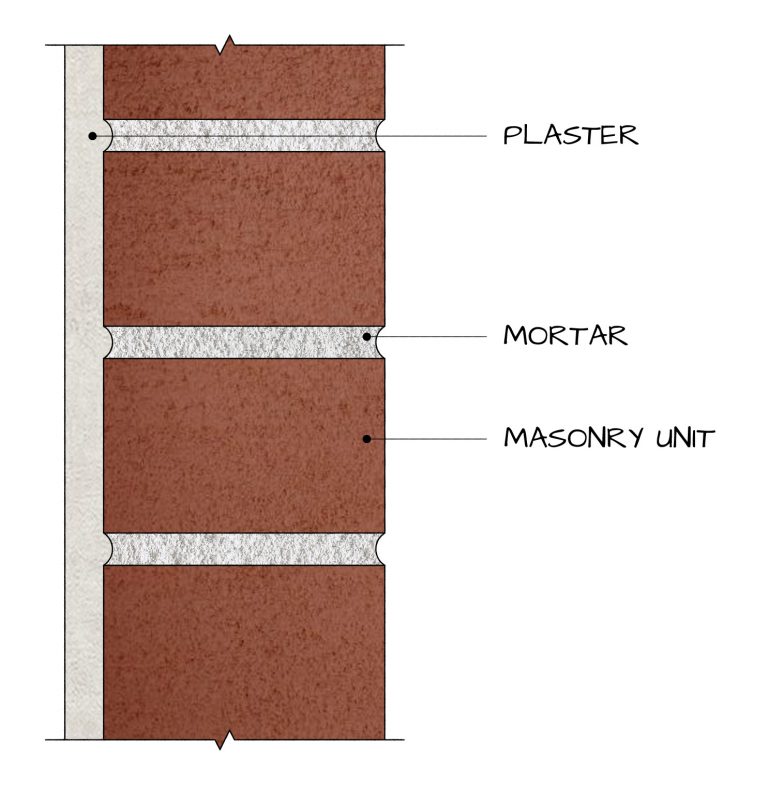
- Masonry units. Individual pieces of clay brick, stone, or adobe that serve as the primary structural component of the wall.
- Mortar. The mortar serves as a glue, holding all of the individual masonry units together and allowing them to act together as a single structural element. Unlike the masonry units, the mortar isn’t pressed or fire-hardened, which allows the wall to expand and contract without damaging the individual masonry units. This expansion and contraction occurs with changes in temperature and humidity, and will allow for the mortar to be damaged rather than the masonry units themselves. Thankfully, replacing the mortar (also known as repointing) can be done much more efficiently and inexpensively than replacing the masonry units themselves.
- Plaster/Stucco. Although not necessary on all masonry walls due to masonry’s ability, and need, to breathe, plaster is sometimes applied to the exterior side of masonry walls to increase their water resistance or for aesthetic reasons. In many instances, the plaster consists of two layers–a thicker base layer that historically contained horse hair, straw, or other binding materials, and a finish coat that is often colored and sometimes scored or otherwise decorated.
Each of these components help ensure that masonry walls remain structurally sound, deflect water, and look nice.
So what does this have to do with using the appropriate mortar? Imagine for a moment that it’s your birthday. You just blew out the candles on a mouthwatering cake, and reach for the knife. Unfortunately, the knife stops after the first sponge. Try as you might, you can’t cut through the filling. Instead of a soft custard or mousse, the cake is filled with a quarter inch of solid chocolate. Although effective in gluing the layers of cake together, the chocolate doesn’t yield to the sponge when the knife presses down. When the knife finally goes through, the bottom layers are a crumbly mess, having lost all structural integrity under the pressure.
Although cement is one of the oldest building materials (looking at you, Parthenon!), the advent of portland cement is comparatively new. Historic mortar was composed of lime and sand, with the occasional addition of pigments or binders (e.g. horse hair). This recipe remained largely unchanged for centuries, until the invention of portland cement in England during the early 19th century. Portland cement wasn’t manufactured in the United States until 1871, at which point its use became increasingly popular. By the 1930s, many masons were using a mix with equal parts lime and portland cement. The ratio of portland cement to lime used in cement mixes continued to increase throughout the 20th century.
Something similar happens when an inappropriate mortar mix (like those available at most hardware stores) is used to replace historic mortar. Unlike masonry and mortar mixes available now, historic mortar and masonry included very little, if any, portland cement. Portland cement is an additive widely used in mortar, cement, concrete and masonry units to reduce setting times, increase water resistance, and increase the hardness of the products. For this reason, the addition of portland cement almost always results in a longer-lasting final product (which explains its widespread use in contemporary building materials).
Although each of these ingredients can be purchased separately and combined on-site to make an appropriate mix, you could also purchase Type L premade mortar mixes which replicate the historic mix. Type O mortar mixes, which contain one part portland cement for every two parts lime, and Type K mixes, which contain one part portland cement for every three parts lime, are also generally appropriate for use on repointing historic masonry. Of the above premade mortar mixes, Type O is the easiest to find in hardware stores and online. In some instances, particularly when the building was built after 1935, Type N mortar mixes may be appropriate. Mortar mixes Type M and Type S contain higher amounts of portland cements and should be avoided.
Given all of these advantages, it may seem counterintuitive to avoid mortars with portland cement when working on historic buildings. But just like using a filling that is harder than the sponge will result in a squished cake, using a mortar that is harder than the brick will result in damage to the masonry units when the building inevitably expands or contracts. For this reason, it is essential that historic mortar is replaced in kind with an appropriately mixed lime mortar, which better matches the composition of historic masonry materials and allows the building to move and breathe as intended.
After all, no one likes squished cake.

Image credit: Old Town Home. “Historic Masonry Repointing and Proper Mortar Selection.” 03 Apr 2013.
Sources:
Hawkins, Dominique M. “Guidelines for Masonry & Stucco.” 2015. City of New Orleans, Vieux Carré Commission.
Mack, Robert C. and John P. Speweik. “Preservation Brief 2: Repointing Mortar Joints in Historic Masonry Buildings.” 1998, Oct. Preservation Briefs: Technical Preservation Services for historic buildings. [Washington, D.C.]: National Park Service.
